|
Perhaps the biggest difference between shooting film and shooting digital is the way the two different media respond to light. Film responds to light the same way our eyes do, but silicon does not. If you’re tempted to just file this information away as a mildly interesting factoid, let me point out that you’d be overlooking the important implications the quirks of silicon’s response have on the way we set exposure on digital captures. If you expose digital the way you expose film, you run twin dangers of failing to exploit the camera’s dynamic range, and creating exposures whose shadows are noisier than they need to be.
Film mimics the eye’s response to light, which is highly nonlinear. Most of our human senses display a significant compressive nonlinearity—a built-in compression that lets us function in a wide range of situations without driving our sensory mechanisms into overload. If you place a golf ball in the palm of your hand, then add another one, it doesn’t feel twice as heavy. If you put two spoonfuls of sugar in your coffee instead of one, it doesn’t taste twice as sweet. If you double the acoustic power going to your stereo speakers, the resulting sound isn’t twice as loud. And if you double the number of photons reaching your eyes, you don’t see the scene as twice as bright—brighter, yes, but not twice as bright. This built-in compression allows your senses to function over an immense range of stimuli. You can go from subdued room lighting to full daylight without your eyeballs catching fire, even though you may have suddenly increased the stimulus reaching those eyeballs by a factor of 10,000 or so. But the sensors in digital cameras lack the compressive nonlinearity typical of human perception. They just count photons in a linear fashion.
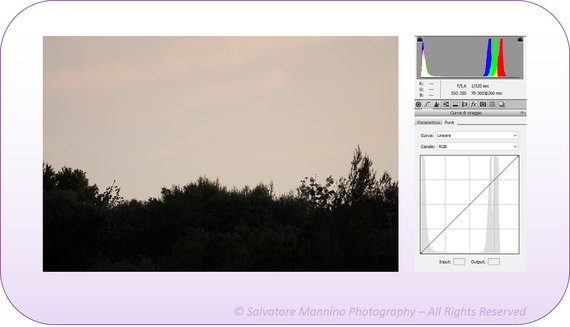
Fig. 1 Linear processed raw captures look very dark. But all the data is there in the image. The histogram of the linear capture shows the vast majority of the data clumped toward the darker end
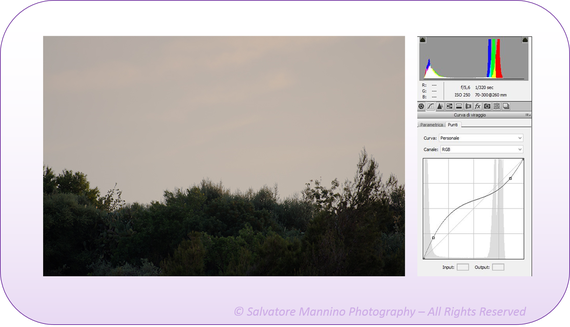
Fig. 2 The same linear processed capture with a tone curve appears normal. On the right the curve required to apply a gamma correction tone to the linear capture. After the tone curve, the histogram has a normal distribution throughout the image.
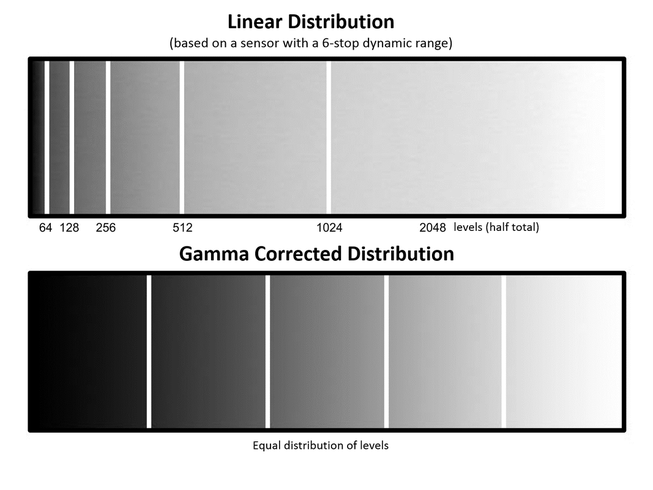
This means that if a camera uses 12 bits to encode the capture into 4,096 levels, then level 2,048 represents half the number of photons recorded at level 4,096. This is the meaning of linear gamma—the levels correspond exactly to the number of photons captured (fig. 3).
Fig. 3 Gamma correction from linear non-linear
Linear capture has important implications for exposure. If a camera captures six stops of dynamic range, half of the 4,096 levels are devoted to the brightest stop, half of the remainder (1,024 levels) are devoted to the next stop, half of the remainder (512 levels) are devoted to the next stop, and so on. The darkest stop, the extreme shadows, is represented by only 64 levels—as shown above.
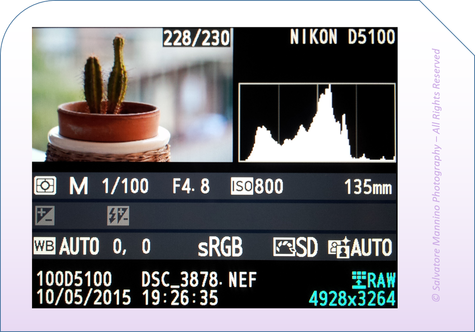
Linear capture You may be tempted to underexpose images to avoid blowing out the highlights, but if you do, you’re wasting a lot of the bits the camera can capture, and you’re running a significant risk of introducing noise in the midtones and shadows. If you underexpose in an attempt to hold highlight detail, and then find that you have to open up the shadows in the raw conversion, you have to spread those 64 levels in the darkest stop over a wider tonal range, which exaggerates noise and invites posterization. Correct exposure is at least as important with digital capture as it is with film, but in the digital realm, correct exposure means keeping the highlights as close as possible to blowing out, without actually doing so. Some photographers refer to this concept as “Expose to the Right” because you want to make sure that your highlights fall as close to the right side of the histogram as possible. Note that the on-camera histogram shows the histogram of the in-camera conversion to JPEG (fig. 4): a raw histogram would be a rather strange-looking beast, with all the data clumped at the shadow end, so cameras show the histogram of the image after processing using the camera’s default settings. Most cameras apply a fairly strong S-curve to the raw data so that the JPEGs have a more film-like response, with the result that the on-camera histogram often tells you that your highlights are blown when, in fact, they aren’t.
Fig. 4 Looking at the camera histogram will only offer a general guide to exposure
There’s one more important factor that plays into exposure setting when you shoot digital captures. The response of a camera set to ISO 100 may really be more like ISO 125 or even ISO 150 (or, for that matter, ISO 75). It’s well worth spending some time determining your camera’s real sensitivity at different speeds, and learning just how far you can trust the on-board histogram to show highlight clipping. Once you’ve done so, you can dial in an appropriate exposure compensation to make sure that you’re making the best use of the available bits.
I’d be remiss if I didn’t mention one of the great strengths of Adobe® Camera Ra w in this area, the extended highlight recovery feature, which kicks in when you set the Exposure slider to negative values. Most raw converters give up on highlights once a single channel is driven to clipping, but Camera Raw does its best to reconstruct highlight detail from a single channel. Depending on the camera model and the color temperature settings, you may be able to recover as much as one stop of highlight detail, though one-third stop is more typical. If you use Camera Raw, it’s worth spending some time conducting exposure tests to see just how far you can comfortably push the exposure.
All of the informatios here treated are born from my personal studies, most of them taken from Bruce Fraser's book "Real World Camera Raw", published by Peachpit Press, in August, 2004. Bruce has made a study of human vision and how it relates to reproducible color in photography.
0 Comments
|


 RSS Feed
